
Greetings to everyone.
Since there are people in the group who do not know the MSX system and have not had anything to do with this wonderful machine, I will help you take the first steps with one of the simplest and most used MSX emulators: BLUEMSX.
The first thing to do is to download the emulator, below is the link: http://bluemsx.msxblue.com/download.html
Unfortunately it hasn't been updated for a while now, but it's a great emulator.
The version to download is 2.8.2, since it is the latest. Although it is very simple to use, there are many things it can do, so I will limit myself to explaining the necessary functions.
This is the first thing you will see after launching it for the first time.
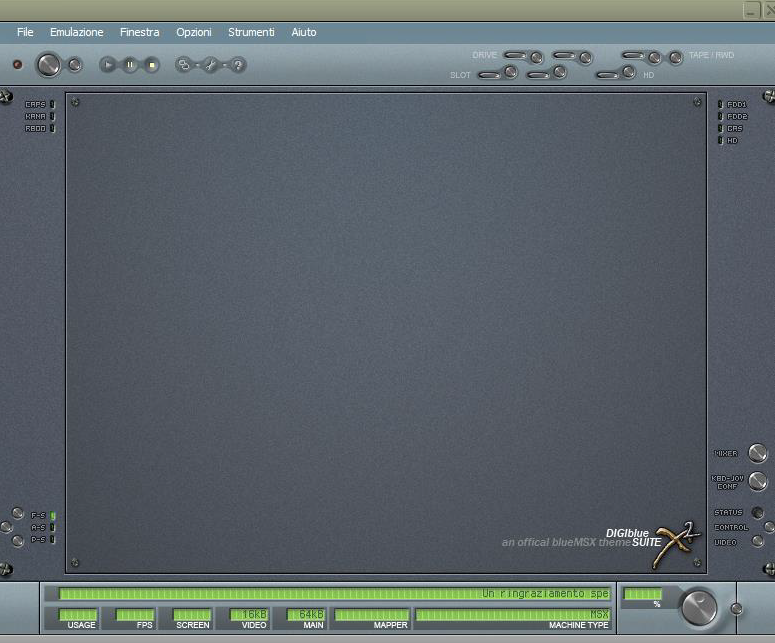
At the top of the screen there is a menu with 6 items: File, Emulation, Window, Options, Tools and Help. Right below we will see some buttons, but it is not essential to know how they work, since they are the copy of some functions that you will find above. They have been placed, because they are the ones that we will use often. Maybe, if there is time I will mention something. The only button that we need to know is the first one on the left; the Reset, every time we use it it will restart the system.
By clicking on File, the first item in the top menu, another drop-down menu will open with the following items:

The first entry: Expansion Slot 1, would be the first cartridge port. Moving the cursor over this choice will open another drop-down menu:

By clicking on the first item, Insert or quickly by simultaneously clicking left CTRL + F7, a file search window will open, where it will display only the ROM files. By double-clicking on the ROM that we want to load or on OPEN after highlighting it, it will start automatically. To exit, we must remove the ROM, the third item always on the same menu: Remove.
I'm leaving out the second item: Insert Special, since it's used to insert expansions, music cards, HDs, etc. I'll talk about it at the end of this tutorial, the important thing is that you first understand how to load games and programs.
Everything that follows, in this submenu are the roms that you have previously loaded, in fact it keeps 10 names in memory, but you will see this after using it.
The second item in the FILE menu: Expansion Slot 2, is the second cartridge port. The submenu is the same as above.
The third item always in the FILE menu is: Floppy Disk Drive A, easy to guess, it reads all DSK formats. Clicking on it, as mentioned above, will open a submenu:
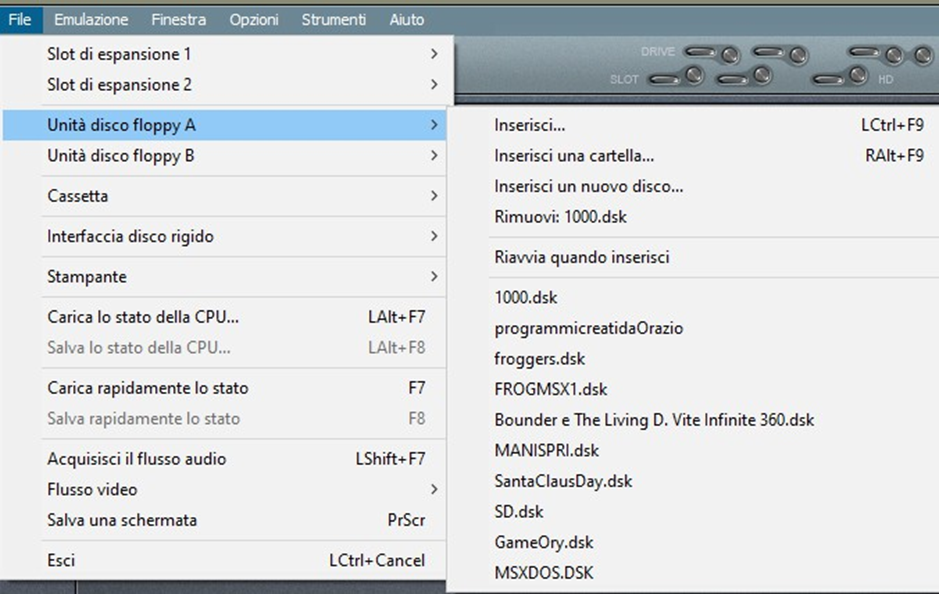
The first item: Insert, search for .DSK files (The procedure is as said for ROMs), here too we can use the quick search keys left CTRL + F9. The second item: Insert a folder, which can also be activated by pressing right CTRL + F9, you have the possibility of searching for folders or even creating them. A submenu will open, displaying the folders where the program has been installed:
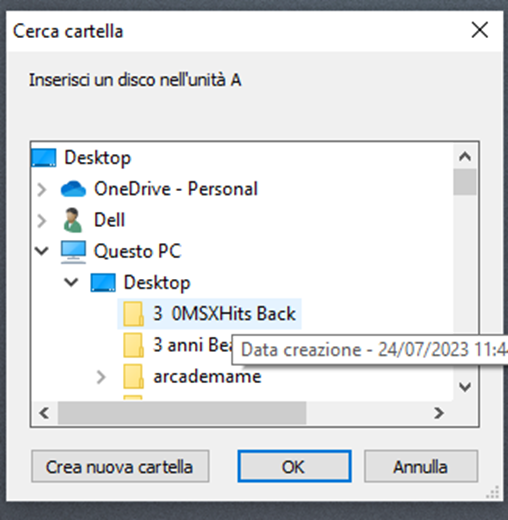
For example, if it is on the desktop, we will see all the folders on the desktop. At the bottom there are three options: Create new folder, OK and Cancel.
The third item: Insert a new disk, gives you the option to insert without removing what is inside the drive, the operation will be done automatically. The fourth item: Remove, is identical to that of the ROM.
The fifth item: Reboot when inserting, activates and deactivates a flag, that is, if this is active, every time you put a disk in the drive it will reset itself from Solo, otherwise you will have to do it manually.
The rest of the entries, as I said for the ROMs, are names of the files loaded previously.
Fourth FILE menu item: Floppy disk drive B, same as above, however very useful for working with the double disk for those programs that create data files.
The fifth entry: Cassette, manages everything related to magnetic tapes:
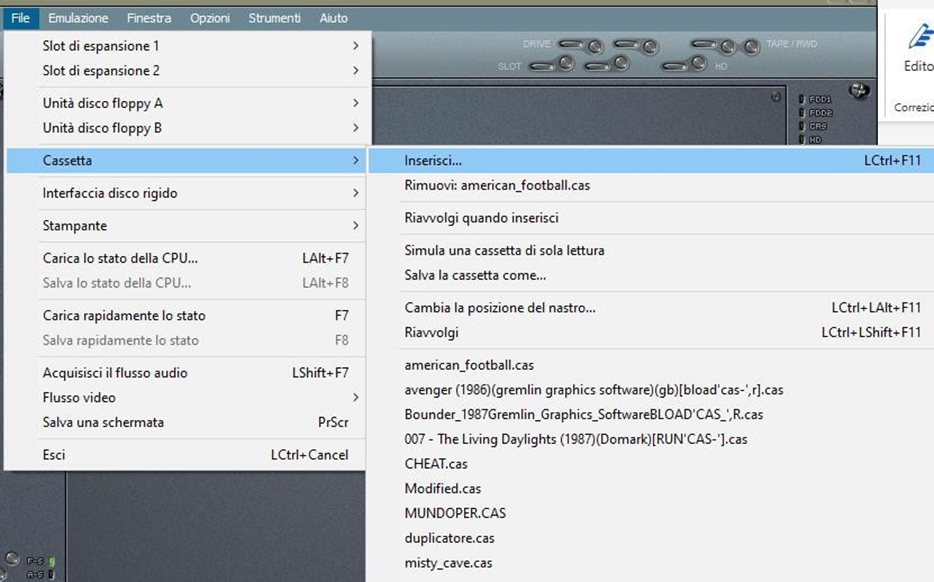
The submenu, as you can see in the image above, has several options. The first item: Insert, is like the previous ones, clicking on it will open the search page. The search will only be for .CAS files as in other media. The next item, Remove, will be used to extract the cassette. The third item: Rewind when inserting, will activate or deactivate the option with a flag. That is, when the flag is on all the cassettes that we insert will start from the beginning.

The fourth and fifth items: Simulate read-only cassette and Save cassette as… are not of interest to us, they are items used to save the listings.
The voice: Change tape position, instead is a very useful function. It is used
to load a game located anywhere on the tape. In fact, clicking on this item will open a window with all the files on the tape.
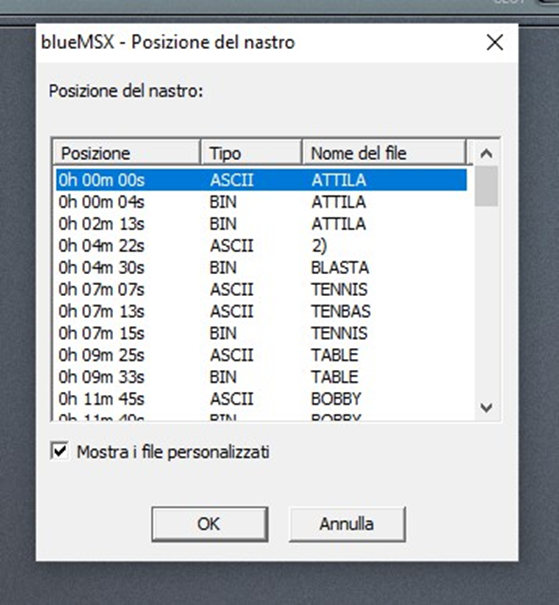
We can move with the 2 cursor keys up and down and confirm with enter or directly with the mouse by clicking on the file we want to start. Here too we have the possibility of using the quick method by clicking left CTRL + left ALT + F11.
The last item: Rewind, useful when we want to return the tape to the beginning, for example, when we want to load the same game again.
I will continue in the next episode. Anyway, with what I have said you can already start doing something, like loading games from Rom, disk or cassette.